Welcome: Xi'an Cabin Kitchen Wares Co.,LTD


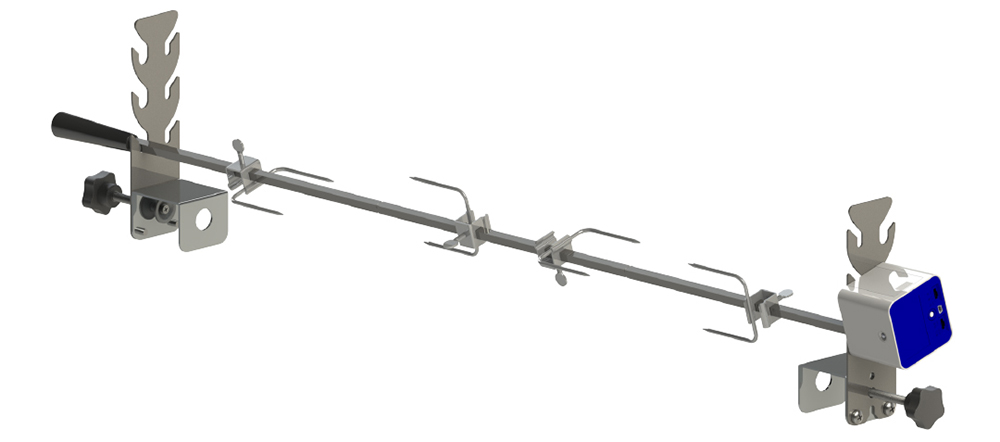
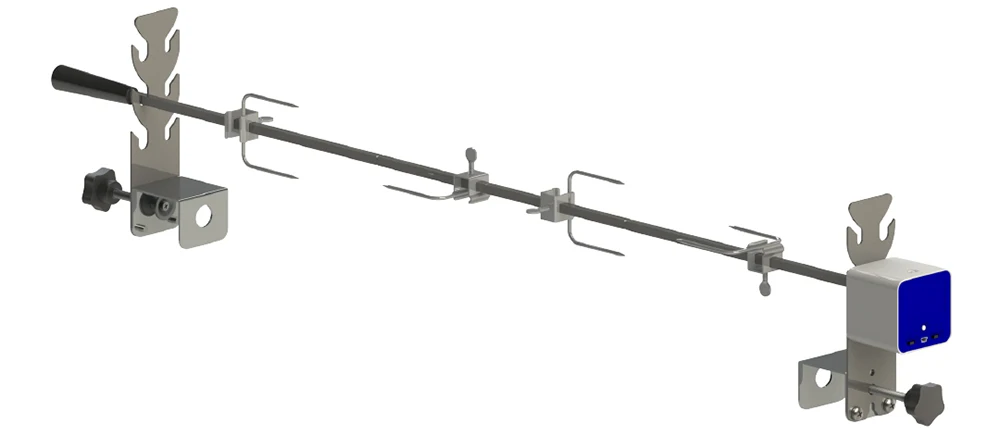
Deluxe BBQ Spit Rotisserie Electric Automatic USB Motor DC 5V Free Length Adjustment Camping grill Roaster Accessories.
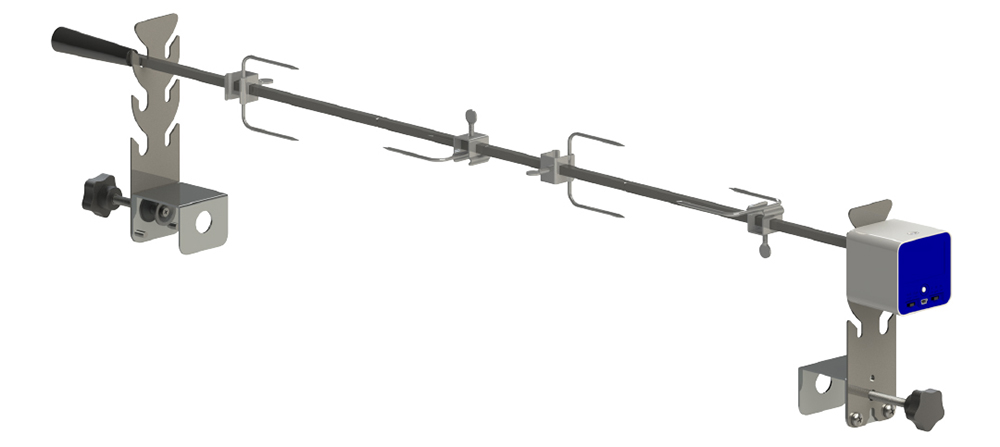
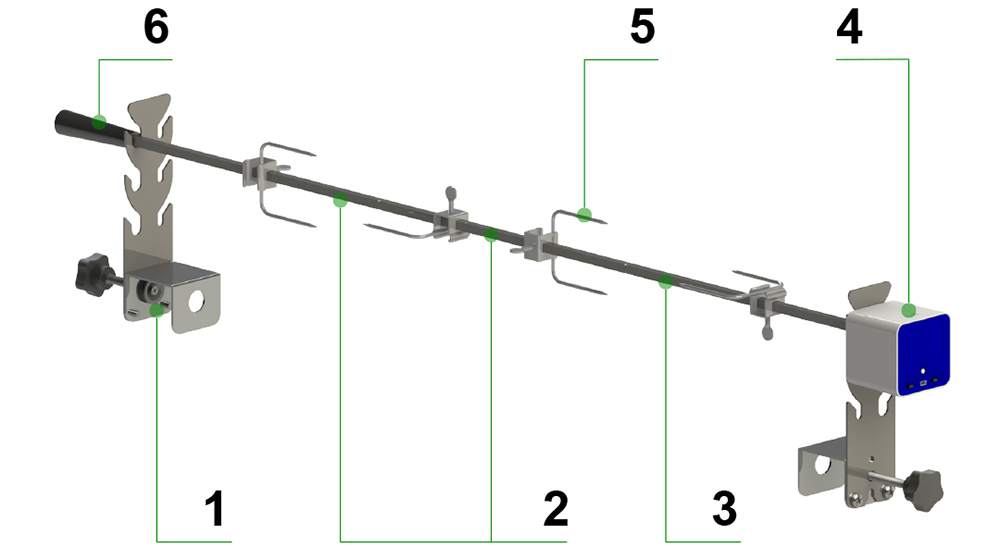
Electric Rotisserie is composed of the following parts:
1 Bracket(430 stainless steel) 2 Extension rod(stainless steel) 3 Rotating rod(stainless steel) 4 Multi-function DC motor 5 Fork(304 stainless steel) with thumb screws(304 stainless steel) 6 Nylon Handle
It can be installed on the ovens to automatic rotate roast whole chicken, roast fish, roast vegetables, etc. Quick to install without tools and easy to carry. The length can be adjusted freely within the effective range.

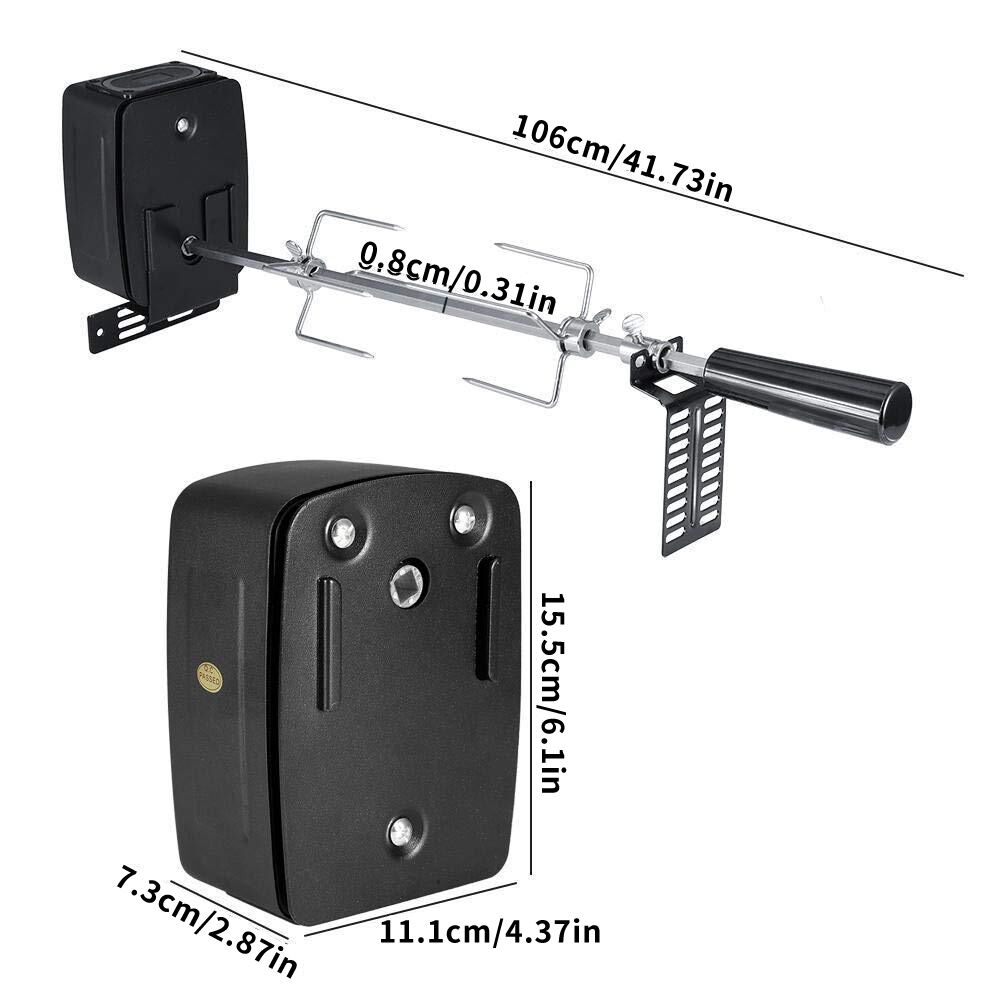
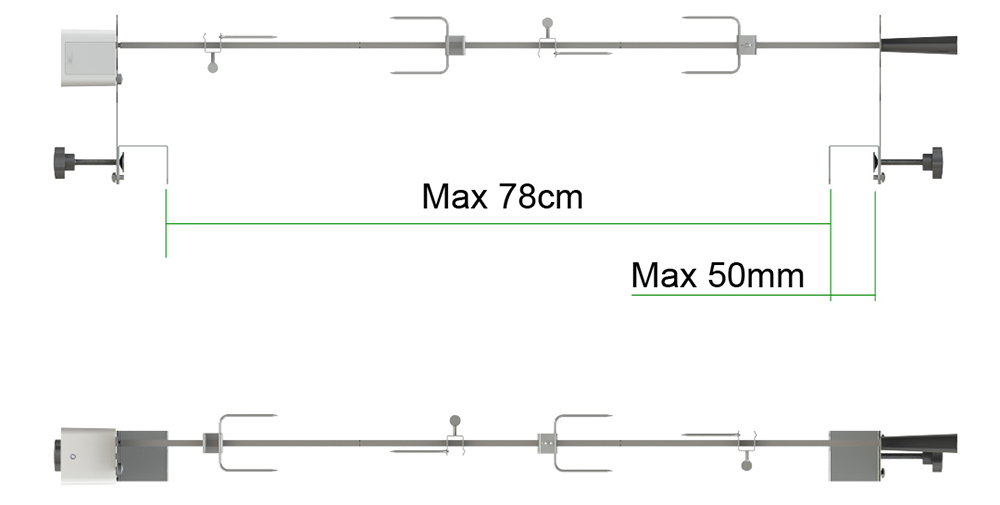
DIMENSION
Supports ovens(BBQ stoves) with inner diameters below 78cm. They all clamping ovens(BBQ stoves) wall thickness are not exceeding 50mm. If you are not sure whether your oven(BBQ stove) is suitable, you can provide a picture of your oven(BBQ stove) inner diameters and wall thickness to the customer service online.

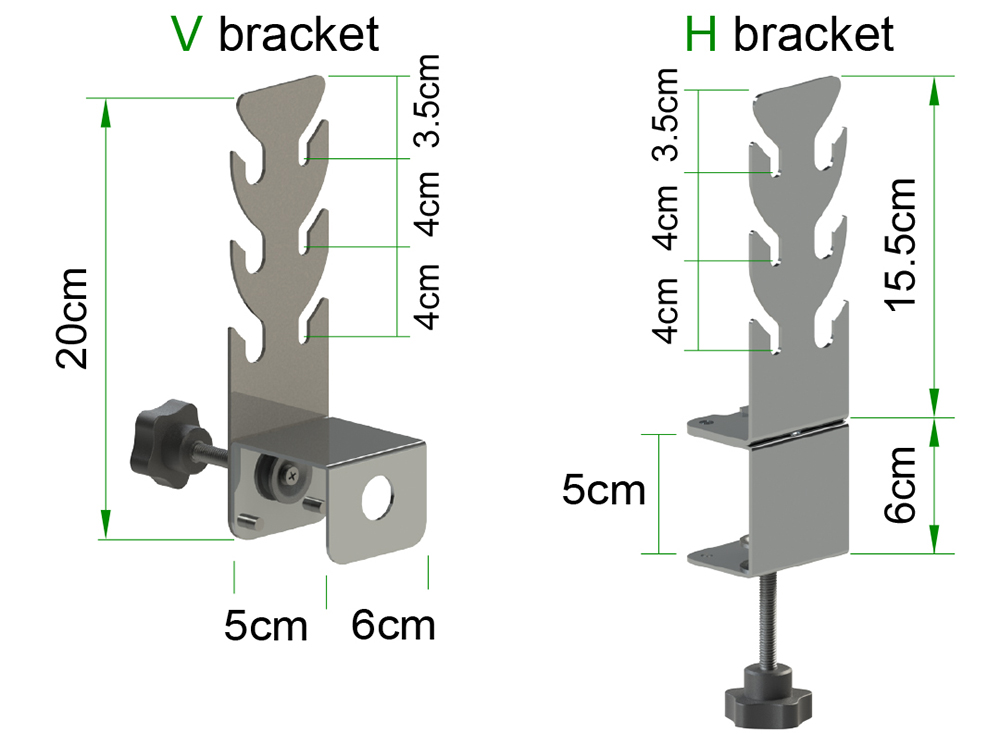
BRACKET
NOTE: The default are V(vertical) brackets.
There are two kinds of brackets: V(vertical) brackets and H(horizontal) brackets and Use V(vertical) brackets by default, If you need H(horizontal) brackets, please contact customer service.
All brackets using 2mm thickness plates, with three heights, and using thread locking devices.

THREE HEIGHTS
High - Middle - Low


DEFAULT USE THE V(VERTICAL) BRACKET TO INSTALL ON THE OVEN (BBQ STOVE)
NOTE: The oven(BBQ stove) below not included

USE H(HORIZONTAL) BRACKET TO INSTALL ON THE BBQ TABLE (please contact customer service)
NOTE: The BBQ table below not included

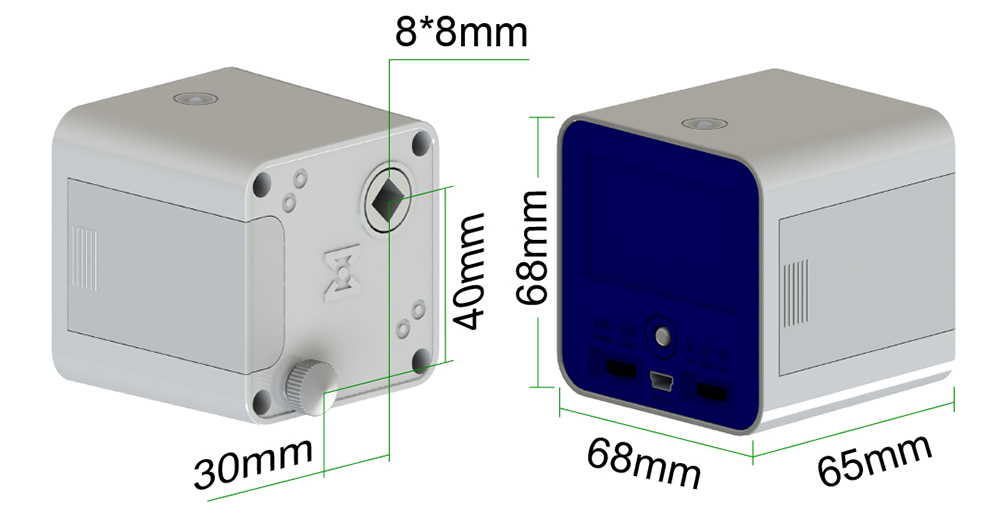
MULTI-FUNCTION DC MOTOR(DON'T USE rechargeable battery)
Specifications:
Condition: 100% Brand New
Material: Nylon + Metal
Main Color: White
No Load Current: Below 180MA
Output : 2~5RPM
Rotary Direction: CW
Voltage: DC 5V(With 1 meter USB wire)
Battery: 3pcs AAA batteries (not included, DON’T USE rechargeable battery)
NOTE:DON'T USE rechargeable battery
Rotator Port : 0~5.0kgf.cm(0~11 lbs)
Roast Branch Size: 8 * 8mm / 0.32 * 0.32in
Motor Size: 6.8 * 6.8 *6.5cm / 2.7 * 2.7 * 2.6in

1 Battery 2 Power 3 Mini-USB 4 Off 5 Slow 6 Fast 7 Limit Pin 8 Output Shaft 9 Parameter Tag 10 LED Switch 11 Battery Compartment Cover 12 LED

MOTOR INSTALLATION INSTRUCTIONS
STEP1
Press and slide out the Battery Compartment Cover.
STEP2
Put in 3pcs AAA batteries (prepared by customer,DON'T USE rechargeable battery) or connect with a power bank (prepared by customer) use the USB wire.
NOTE:Many power banks on the market have over-current protection functions. When the motor is used, the current passing through increases as the load increases.
Once the allowable current is exceeded, the power bank will automatically cut off the power, which will cause the motor to stop, which is not the quality of the motor.
For this reason, we recommend using a power bank without over-current protection function.
STEP3
Insert the motor output shaft to the Rotating rod.
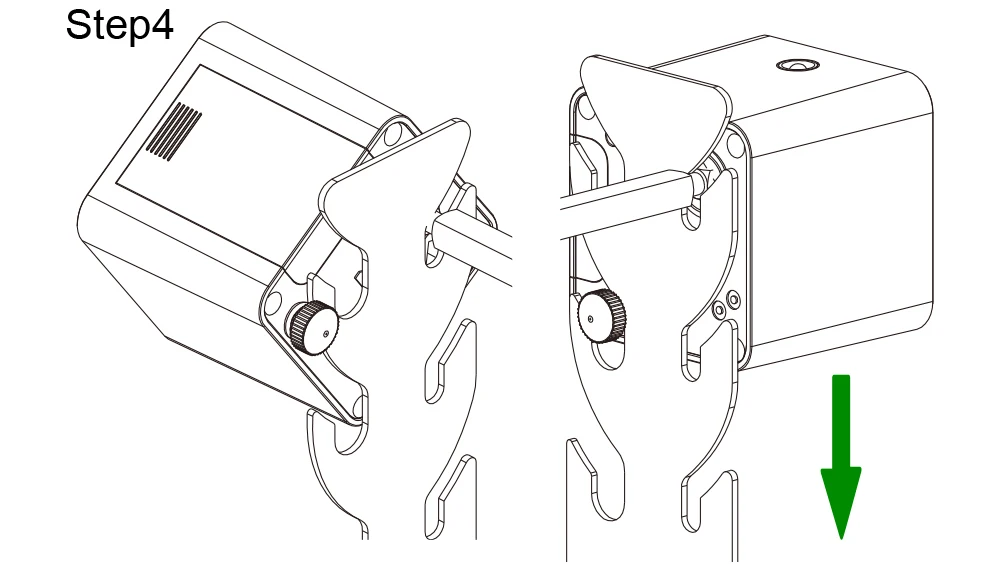
STEP4
Option A
If the limit pin is pre-screwed onto the motor, as shown in the figure below, lift the motor slightly and rotate it at an angle to allow the limit pin to slide into the large groove, and then let it fall freely.


Option B
If the limit pin is not screwed on the motor in advance, as shown in the figure below, insert the limit pin and tighten it clockwise to fix it.

INSTALLATION STEPS
Step1
Turn the locking screws on the one bracket counterclockwise to loosen to the appropriate position.
Then clamp this bracket to the appropriate position of the oven(BBQ stove) (sold separately, the same below), Turn the locking screw clockwise not to tighten.

Step2
In the same way, clamp the other bracket to the other side of the oven(BBQ stove).

Step3
Turn the one or two Extension rods(2) clockwise to the Rotating rod(3), do not tighten, Screw the Nylon Handle(6) to the Extension rod (2) in the same way and tighten it.

Step4
Put it on the brackets to test as shown (the Rotating rod is placed in the small groove, the Extension rod is placed in the large groove), that it can rotate smoothly, and then tighten the locking screws on the brackets.

Step5
The forks through the rod, screw the thumb screws to the forks. After loading the food, adjust it to the proper position and tighten the thumb screws.

NORMAL MISALIGNMENT
NOTE: Thread processing needs to have a certain clearance, so it is difficult to have the same plane after the rod is tightened, and there will be a normal misalignment.
At this time, you only need to loosen the rod a little, then put on the fork to the rod after the plane coincides. Tighten the rod after all the food is loaded.

Step6
Refer to step 4 place it in the proper height on the brackets to rotate.

Step7
Refer to motor installation instructions.

Step8
The installation is complete.
Option A is suitable for ovens(BBQ stoves): Supports ovens(BBQ stoves) with inner diameters below 78cm. They all clamping ovens(BBQ stoves) wall thickness are not exceeding 50mm.
Option B provides you with more DIY imagination.

Contact: Ernest
Phone: +8618192620733
Tel: +8615202989642
Email: info@cabinkitchenwares.com
Add: 10building,ChangFenYuan,Yanta District,Xi'an.